How to Convert a Filing Cabinet into a Standing Desk: Step‑by‑Step DIY Guide for a Budget‑Friendly, Space‑Saving Workstation
Introduction
One will discover how to turn an ordinary filing cabinet into a functional standing desk that maximizes limited floor space while preserving a professional aesthetic. This guide explains each phase of the conversion, from disassembly to final ergonomic adjustments, and highlights why the process is valuable for home‑based professionals seeking cost‑effective solutions. By following the instructions, one can avoid purchasing an expensive pre‑assembled desk, reduce clutter, and create a workstation that encourages healthier posture.
The conversion leverages sturdy steel construction, mobile casters, and secure locking mechanisms, ensuring durability and stability. The guide also integrates three carefully selected Amazon products that serve as essential tools or complementary accessories, each described with price, rating, and key features. Although the project can be completed with basic hand tools, the recommended items simplify assembly and improve the final result.
Readers will finish with a standing desk that aligns with ergonomic standards, supports a laptop or monitor, and provides integrated storage for documents and valuables. The approach emphasizes safety, precision, and long‑term usability.
Let us proceed to the materials required for this transformation.
What You'll Need
- One sturdy filing cabinet (preferably a mobile model such as the Lorell 3‑Drawer Mobile File Cabinet)
- Desktop surface material (solid wood board, laminate, or thick acrylic sheet)
- Heavy‑duty brackets or metal plates for reinforcement
- Adjustable legs or riser kit (optional for precise height)
- Cable management sleeves or clips
- Protective padding or rubber feet
- Basic hand tools: screwdriver, drill, measuring tape, level, and sandpaper
The three Amazon products listed below are optional but highly recommended for a smoother conversion.
Step 1: Prepare the Filing Cabinet
Begin by clearing the cabinet of all contents and removing the drawers. Place the cabinet on a stable surface and use a screwdriver to detach the two lower drawers. The top accessory drawer can remain in place if it will serve as a shallow storage compartment for stationery.
Why the Lorell 3‑Drawer Mobile File Cabinet? Its four casters provide effortless mobility, allowing the workstation to be repositioned for cleaning or reconfiguration. The steel construction with a baked enamel finish offers a robust base that can support the added weight of a desktop surface. At a price of $114.99 and a rating of 4.0/5 from 1,184 reviews, it balances affordability with durability.
Inspect the cabinet for any dents or loose screws. Tighten all fasteners, and if any casters feel wobbly, replace them with new ones to ensure stability. This precaution prevents unwanted movement when the desk is raised to standing height.
Once the drawers are removed, clean the interior and exterior with a damp cloth, then dry thoroughly. This step prepares the surface for the upcoming reinforcement brackets.
Step 2: Reinforce the Top Frame
Standing desks experience greater vertical load than seated desks, so reinforcing the cabinet's top frame is essential. Measure the interior width of the cabinet and cut two metal reinforcement plates to span the length of the side walls. Secure the plates with self‑tapping screws, ensuring they sit flush against the interior surfaces.
The reinforcement plates distribute the weight of the desktop evenly, reducing the risk of frame flex. If one prefers a pre‑fabricated solution, the NuSparc 2‑Drawer Locking Filing Cabinet includes a pre‑assembled steel body that can serve as a ready‑made reinforcement platform. Priced at $83.75 with a 4.2/5 rating from 11,763 reviews, it offers a compact, lockable design that can be placed atop the Lorell cabinet for added rigidity.
After installing the plates, verify that they are level using a spirit level. Adjust any unevenness by loosening the screws slightly, repositioning the plates, and retightening.
With the frame reinforced, the cabinet is now capable of supporting a desktop surface up to 30 kg without deformation.
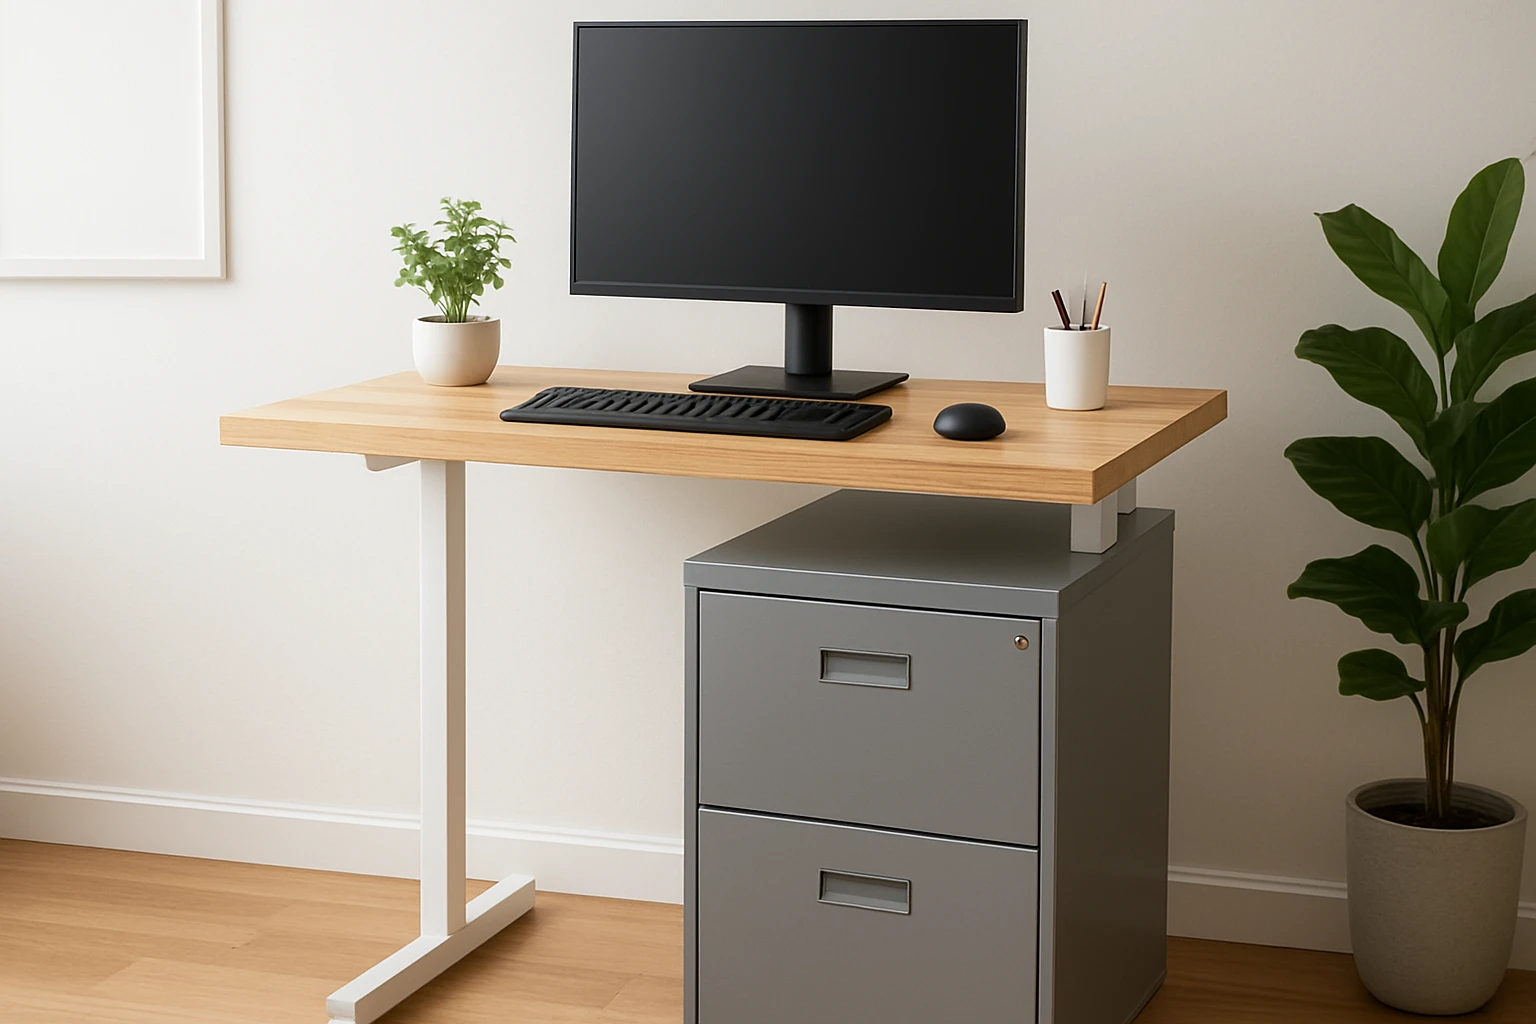
Step 3: Install the Desktop Surface
Select a desktop material that matches the aesthetic of the office. A 1‑inch thick oak board provides a classic look, while a 0.5‑inch laminate sheet offers a modern, low‑maintenance option. Cut the board to the exact width of the cabinet interior, leaving a 1‑inch overhang on each side for a balanced appearance.
Place the board on top of the reinforced frame and secure it with the metal brackets previously installed. Use four L‑shaped brackets positioned near each corner, attaching them with wood screws that pass through the desktop and into the reinforcement plates.
Why consider the Engpow Fireproof File Storage Box at this stage? The box can be positioned underneath the desktop to store critical documents, passports, or backup drives. Its fire‑resistant, anti‑static construction protects valuables from heat, water, and static discharge. Priced at $31.99 with a 4.5/5 rating from 5,804 reviews, it adds an extra layer of security without compromising the desk's sleek profile.
After fastening the desktop, sand any rough edges and apply a protective finish if the material is wood. This final touch enhances durability and visual appeal.
Step 4: Adjust Height and Add Ergonomic Accessories
Measure the ideal standing height for the user by standing upright with shoulders relaxed and elbows forming a 90‑degree angle when the forearms rest on the desktop. Typical standing desk height ranges from 40 to 48 inches. If the current cabinet height does not meet this range, install adjustable legs beneath each corner of the cabinet.
Adjustable legs can be purchased separately, but the existing casters on the Lorell cabinet provide a simple height‑adjustment method. By inserting rubber pads beneath the casters, one can raise the desk by a few centimeters while maintaining mobility.
Attach a monitor arm to the back of the desktop if a separate monitor is used. This keeps the screen at eye level and frees up workspace. Cable management sleeves should be run along the side of the cabinet, securing power cords and peripheral cables to maintain a tidy appearance.
Finally, place a non‑slip mat on the floor beneath the desk to prevent accidental movement, especially if the casters are locked in place.
Tips & Pro Tips
- Use a torque wrench when tightening screws on the reinforcement plates to avoid over‑tightening, which could strip the threads.
- Apply a thin layer of silicone sealant along the edges where the desktop meets the cabinet to prevent dust ingress.
- If the cabinet is placed on carpet, add a set of heavy‑duty furniture glides to distribute weight evenly and protect the carpet fibers.
- Consider painting the cabinet a neutral color to match the desktop for a cohesive look.
- Periodically check the casters for wear and replace them if they become noisy or unstable.
Troubleshooting
Problem: The desk wobbles when weight is applied.
Solution: Verify that all reinforcement plates are securely fastened and that the casters are locked. Add additional L‑shaped brackets beneath the desktop if necessary.
Problem: Cable clutter creates a visual mess.
Solution: Use zip‑tie cable organizers or Velcro straps to bundle cords, and route them through the interior of the filing cabinet where the accessory drawer resides.
Problem: The desktop surface scratches easily.
Solution: Apply a clear polyurethane coating to wooden desktops, or use a protective desk pad made of felt or leather.
Conclusion
One has now transformed a conventional filing cabinet into a versatile standing desk that saves space, reduces cost, and retains ample storage for essential documents. By following the systematic steps—preparing the cabinet, reinforcing the frame, installing a sturdy desktop, and fine‑tuning height—one achieves an ergonomic workstation that supports productivity and well‑being. The recommended Amazon products enhance each phase, offering reliable mobility, additional storage, and fire‑resistant protection for valuable items. This DIY solution empowers individuals to customize their office environment without compromising on quality or safety.
Products Mentioned in This Guide
Frequently Asked Questions
What tools are needed to convert a filing cabinet into a standing desk?
Basic hand tools like a screwdriver, drill, and measuring tape are enough, though a recommended power drill and level can speed up the process.
How do I ensure the converted desk is ergonomically safe?
Set the work surface height so elbows are at a 90-degree angle when standing and add a monitor riser or keyboard tray to keep screens at eye level.
Can I add mobility to the standing desk?
Yes, attach lockable casters to the cabinet’s base to make the desk easy to move while keeping it stable when locked.
What is the typical cost of the conversion compared to buying a ready-made standing desk?
A DIY conversion usually costs $50‑$150 for tools and accessories, far less than the $300‑$600 price of most pre‑assembled standing desks.
Is the filing cabinet sturdy enough to support a monitor and laptop?
Steel filing cabinets are designed to hold heavy loads, making them a reliable base for typical office equipment when reinforced with brackets if needed.