How to Set Up a Standing Desk for Music Producers in Small Rooms: Space‑Saving, Ergonomic Home Studio Solutions
Introduction
In modern home studios, the ability to transition between sitting and standing can improve posture, increase energy, and foster creativity. This guide explains how a music producer can design a functional workstation within a limited footprint while preserving acoustic quality and workflow efficiency. Readers will learn how to evaluate room constraints, select an appropriate standing desk, manage cables, and position monitors and audio gear for optimal ergonomics. By following each step, one can achieve a professional‑grade environment without sacrificing valuable floor space.
What You'll Need
- Standing desk (see product recommendations below)
- Monitor arms or stands
- Cable management accessories (clips, trays, Velcro ties)
- Acoustic treatment panels or foam
- Studio monitors and headphones
- Power strip with surge protection
- Basic tools: screwdriver, Allen key (often included with desk)
Step‑by‑Step Instructions
1. Assess Room Layout and Measure Available Space
The first task is to create a scaled floor plan that includes windows, doors, and any permanent furniture. Measure the length, width, and height of the room, then mark the area where the desk will be placed, ensuring at least 60 cm of clearance behind monitors for acoustic panels. Identify potential obstacles such as heating vents or lighting rigs that could limit desk movement. By visualising the layout, one can determine whether a full‑size desk or a compact model will fit without crowding the room.
2. Choose the Appropriate Standing Desk Size
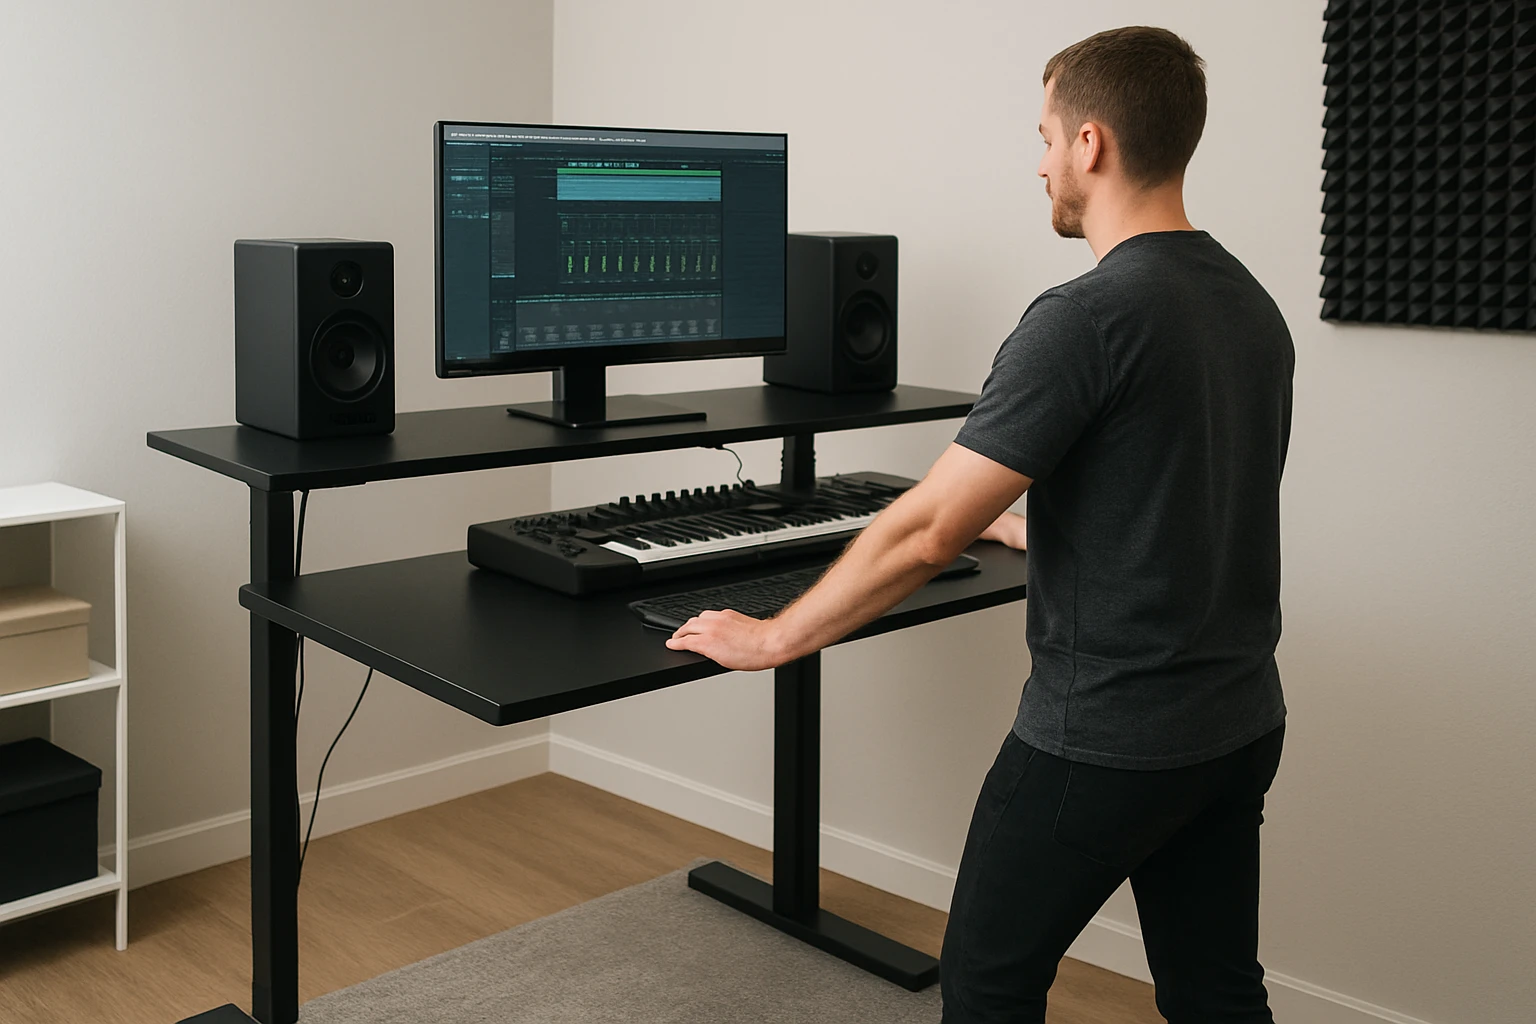
For rooms smaller than 10 m², a compact footprint often yields the best results. The Joyseeker Compact Electric Standing Desk offers a 35 × 20 inch desktop that comfortably accommodates a laptop, a small MIDI controller, and a pair of studio monitors. Its industrial‑grade steel frame supports up to 176 lb, providing stability for heavier audio equipment. The desk features three programmable height presets, a quiet motor under 55 dB, and two built‑in hooks for headphones or cables, all for $89.99 with a 4.7‑star rating from 138 reviewers.
In slightly larger rooms, the Furmax Electric Standing Desk supplies a 45 × 24 inch surface, allowing placement of dual monitors, a control surface, and a small audio interface simultaneously. Its commercial‑grade steel frame tolerates up to 154 lb, and the motor operates below 55 dB with four memory presets. At $69.99 and a 4.4‑star rating from 1,921 reviews, it delivers excellent value for producers who need extra desktop real‑estate without compromising stability.
When deciding between the two, consider the total width of your monitor arm system and any additional peripherals. If the combined width exceeds 30 inches, the larger Furmax desk will prevent edge‑to‑edge crowding. Conversely, if the studio is a bedroom corner or a shared living area, the Joyseeker model preserves walking pathways and leaves room for acoustic panels.
3. Assemble the Desk According to Manufacturer Instructions
Both desks include detailed manuals and video guides; however, a systematic approach reduces errors. Begin by unpacking all components and verifying that each part matches the inventory list. Attach the steel frame to the tabletop using the provided Allen‑key bolts, ensuring that the connection plates are fully seated to avoid wobble. For the Furmax desk, note that the desktop arrives in two halves; align the splice board correctly before tightening the screws. The Joyseeker desk’s single‑piece top simplifies this step.
After the frame is secure, connect the power cable to the motor controller, then test the lift function by pressing the up button briefly. Verify that the desk reaches both the lowest (approximately 30 inches) and highest (approximately 46 inches) positions without stalling. If the motor emits unusual noise, check that the load is evenly distributed and that the frame is level. Once operation is confirmed, tighten all fasteners a final time to ensure long‑term durability.
4. Implement Cable Management for a Clean Signal Path
Unmanaged cables can introduce electromagnetic interference, create trip hazards, and obscure visual access to controls. Both desks incorporate integrated cable trays: the Furmax model includes a dedicated tray beneath the desktop, while the Joyseeker desk offers a built‑in cable management channel and two external hooks. Route power cords, USB cables, and audio cables through these pathways, securing them with Velcro ties every 30 cm to prevent sagging.
For additional organization, install a 2‑U rack mount power strip on the underside of the desk, positioning it near the motor controller to keep the main power cord short. Use a short‑length HDMI or DisplayPort cable for monitor connections to minimise clutter. Finally, label each cable with a heat‑shrink tag to simplify future troubleshooting.
5. Position Monitors and Audio Equipment Ergonomically
Proper monitor placement reduces neck strain and ensures accurate stereo imaging. The top of each monitor should align with the producer's ear height when standing, typically 95–105 mm above eye level. Use adjustable monitor arms that clamp to the desk surface; this allows fine‑tuning of height and angle without drilling additional holes. Place the primary studio monitors at an equilateral triangle distance from the listening position, with the desk forming one side of the triangle.
If the desk surface is limited, consider a vertical monitor stand for secondary screens, freeing horizontal space for a MIDI controller or audio interface. Place the audio interface on the desk's left side (or right side, depending on dominant hand) to maintain a natural workflow. Ensure that the headphone jack and control knobs remain reachable without excessive reaching, which can lead to repetitive‑strain injuries.
6. Integrate Acoustic Treatment Without Reducing Desk Area
Even in small rooms, strategic placement of absorption panels improves clarity. Mount 2‑inch acoustic foam panels on the wall directly behind the listening position, extending from floor to ear height. Use adhesive strips that do not damage paint. Corner bass traps can be positioned on the floor corners, leaving the desk perimeter clear for leg movement.
When the desk is positioned against a wall, install a thin diffuser panel above the monitor height to prevent low‑frequency buildup while preserving visual space. The compact footprint of the Joyseeker desk makes it easier to leave a one‑foot gap between the desk and wall, facilitating optimal panel placement.
7. Test Ergonomic Settings and Fine‑Tune Height Presets
After the hardware is installed, spend a full workday alternating between sitting and standing to evaluate comfort. Adjust the desk height so that elbows form a 90‑degree angle when typing or using a controller. Record the exact height values for both sitting and standing positions, then program them into the desk’s memory presets (four for Furmax, three for Joyseeker). This enables a single button press to transition between ergonomically optimal configurations.
Observe any strain in the shoulders, wrists, or lower back; if discomfort persists, modify monitor tilt or keyboard angle using the adjustable arms. Re‑evaluate cable routing after each adjustment to ensure that no new tension points have been introduced.
Tips & Pro Tips
- Place a small anti‑fatigue mat on the floor when standing for extended periods; it reduces pressure on the feet and improves circulation.
- Use a wireless keyboard and mouse to keep the desk surface clear for audio gear.
- Schedule a 5‑minute micro‑break every hour to stretch the neck, shoulders, and hamstrings.
- If the room has limited power outlets, employ a surge‑protected power strip with USB ports to consolidate charging cables.
- Consider a desk lamp with adjustable colour temperature to reduce eye strain during late‑night mixing sessions.
Troubleshooting
| Problem | Possible Cause | Solution |
|---|---|---|
| Desk does not rise | Power cable not fully inserted | Check that the motor controller is securely plugged into the wall outlet and that the safety switch is engaged. |
| Excessive wobble at full height | Uneven floor or loose bolts | Place a level on the desktop, tighten all frame screws, and use a small rubber mat under the legs. |
| Noise from motor interferes with recording | Motor vibration transmitted through the desk | Insert a thin rubber isolator between the desk legs and floor; keep microphones at least 30 cm away from the desk surface. |
Conclusion
By carefully assessing room dimensions, selecting a desk that matches the available space, and implementing disciplined cable management and ergonomic positioning, a music producer can create a high‑performance home studio within a small room. The recommended standing desks provide reliable height adjustment, sufficient load capacity, and built‑in organization features that streamline the setup process. Following the outlined steps ensures that the workspace supports both creative flow and physical well‑being, ultimately leading to more productive mixing and production sessions.
Products Mentioned in This Guide
Frequently Asked Questions
How can I choose the right size standing desk for a small home studio?
Measure your room’s usable floor space and select a desk with a compact footprint or adjustable width that fits without blocking acoustic panels or walkways.
What ergonomic setup should I use for monitors and audio gear on a standing desk?
Mount monitors at eye level using arms, keep the keyboard and controller within arm’s reach, and position studio monitors at ear height and an equal‑angle triangle from your listening position.
How do I manage cables to keep a small studio tidy?
Use cable trays, Velcro ties, and clips to route power and audio cables under the desk and along walls, preventing clutter and preserving floor space.
Can I maintain good acoustic treatment with a standing desk?
Yes—place acoustic panels on walls and ceiling around the desk, and use low‑profile desk surfaces that don’t interfere with sound diffusion or absorption.
What tools and accessories are essential for setting up a standing desk in a limited space?
Basic tools like a screwdriver or Allen key, a surge‑protected power strip, monitor arms, and cable management kits are all you need to install and organize the desk efficiently.