How to Convert a Murphy Desk into a Standing Desk for Your Micro Apartment: Step‑by‑Step DIY Space‑Saving Guide
Introduction
Living in a micro apartment often requires creative solutions to maximize limited floor area while maintaining comfort and productivity. One of the most effective strategies is to combine a space‑saving Murphy desk with a standing‑desk configuration, thereby creating a flexible workstation that supports both seated and upright tasks. This guide will teach the reader how to assess the environment, select appropriate tools, and execute a safe conversion that enhances ergonomics without sacrificing valuable square footage. By following the detailed steps, the reader will achieve a functional, stylish, and health‑promoting workspace suitable for any compact living situation.
The process described herein does not demand professional carpentry experience; however, a basic familiarity with tools, measuring, and wall mounting is beneficial. The recommended products are chosen for their compatibility with small spaces, ease of assembly, and reliable user feedback. The reader may opt to use alternative items, but the guide highlights why each suggested product offers distinct advantages for the specific task at hand.
What You’ll Need
- Cayglow Wall‑Mounted Foldable Desk – $139.96, rating 3.7/5 (27 reviews)
- HOMCOM Fold‑Out Convertible Desk – $359.09, rating not provided
- Veken Adjustable Standing Desk – $89.99, rating 4.7/5 (1,448 reviews)
- VIVO 32" Sit‑Stand Desk Converter – $129.99, rating 4.6/5 (2,053 reviews)
- VariDesk Pro Plus 36 – price not provided, rating not provided
- Stud finder, level, drill with appropriate bits, screwdriver set, wall anchors, measuring tape, pencil, and safety goggles.
Step 1: Measure the Available Wall Space and Determine Height Range
The first task is to evaluate the wall where the Murphy desk will be installed, ensuring that there is sufficient vertical clearance for both the folded and extended positions. Use a measuring tape to record the distance from floor to ceiling, then subtract the desired standing height, typically between 42 and 48 inches for most adults. Record these dimensions in a notebook to guide subsequent product selection and mounting placement. Confirm that no electrical outlets, light switches, or HVAC vents will be obstructed by the desk when it is raised.
Accurate measurements prevent costly re‑installation and guarantee that the standing platform will operate within a comfortable ergonomic range. If the ceiling height is limited, consider a lower standing height and pair the desk with a monitor riser to maintain eye‑level alignment. This preparatory step also informs the selection between the Cayglow and HOMCOM models, each of which offers distinct mounting options and height adjustability.
Step 2: Choose the Base Murphy Desk
For a micro apartment, the Cayglow Wall‑Mounted Foldable Desk provides an economical solution that folds flat against the wall, creating a shelf when not in use. Its particleboard construction combined with solid metal hardware offers stability, while the built‑in blackboard adds a functional note‑taking surface. The product is priced at $139.96 and carries a moderate rating of 3.7/5, indicating acceptable durability for budget‑conscious users.
If the user prefers a more robust frame and higher weight capacity, the HOMCOM Fold‑Out Convertible Desk delivers solid MDF and pine wood construction, rated for a total load of 132 lb. Although priced higher at $359.09, it offers a larger work surface and a more substantial feel, which may be advantageous for users who intend to place multiple monitors on the desk. The decision between the two should be based on budget, aesthetic preference, and expected load.
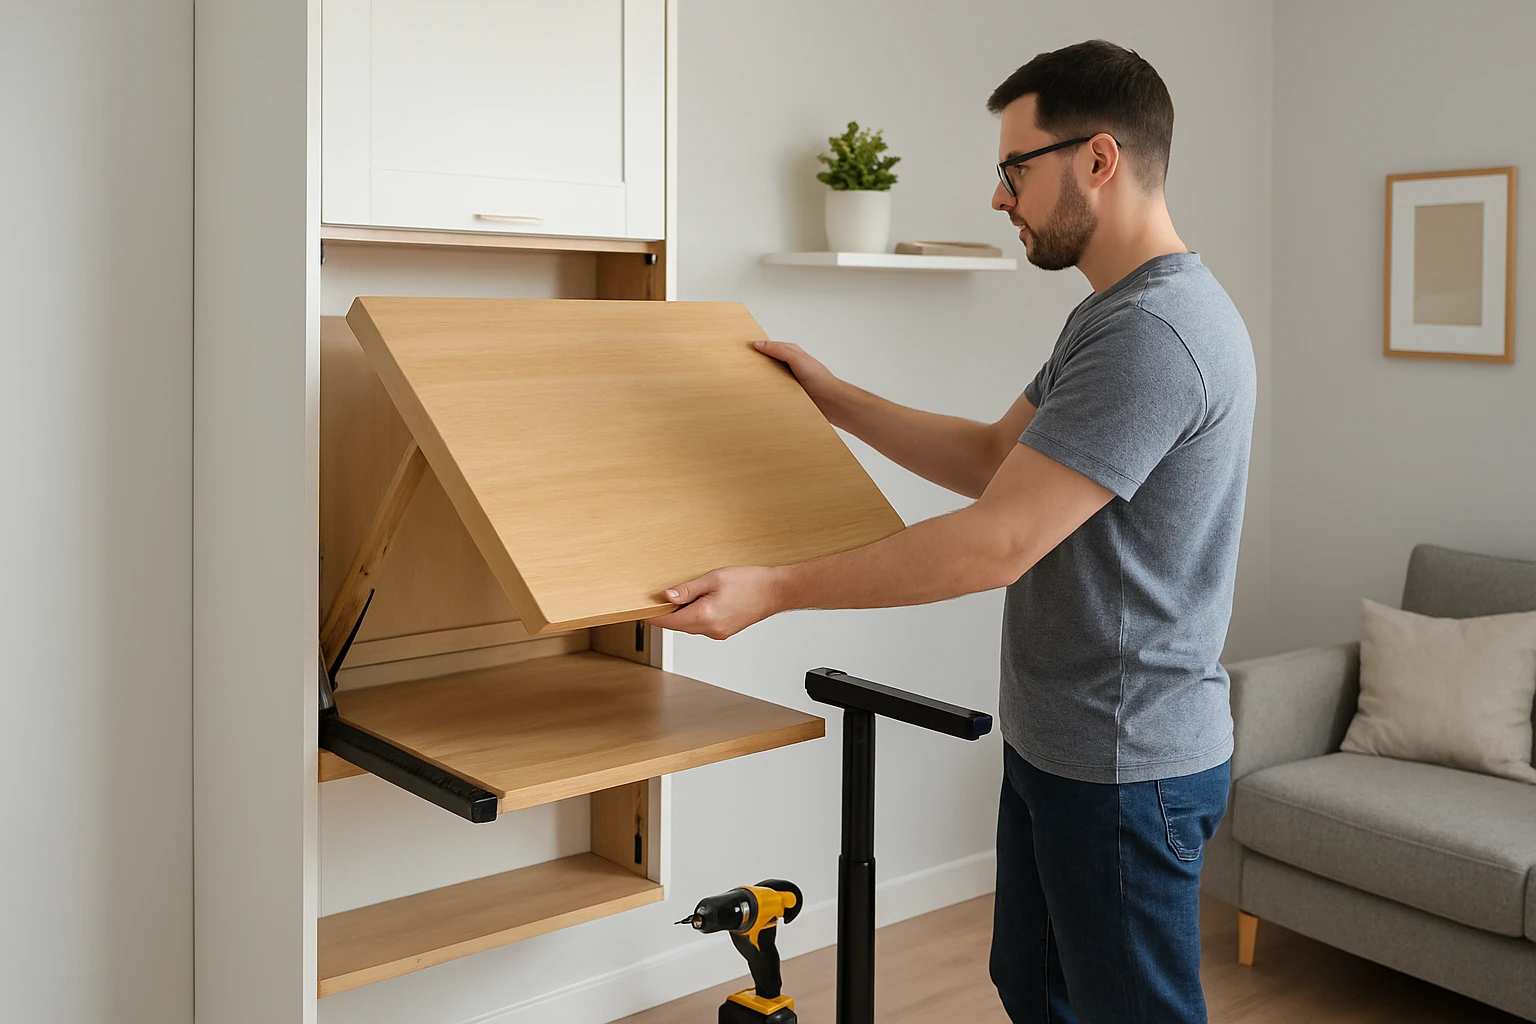
Step 3: Install the Wall Mount Securely
Both Murphy desks feature an anti‑toppling design that requires anchoring to wall studs. Locate the studs using a stud finder, then mark the drilling points with a pencil. Pre‑drill pilot holes, insert appropriate wall anchors if studs are not directly behind the intended mounting location, and secure the mounting brackets with the supplied screws. Use a level to verify that the brackets are perfectly horizontal before tightening completely.
The Cayglow model includes pre‑drilled nail holes for a simple nail‑into‑stud method, reducing installation time for users comfortable with basic carpentry. The HOMCOM desk, however, provides a more extensive bracket system that may require additional hardware but offers greater load distribution. Ensuring a solid mount is critical because the standing conversion will introduce dynamic forces when the height‑adjustable platform is raised and lowered.
Step 4: Add a Height‑Adjustable Platform
To transform the fixed Murphy desk into a standing workstation, attach a height‑adjustable platform such as the Veken Adjustable Standing Desk. This electric desk offers smooth height adjustment from 28.3 inches to 46.5 inches, covering the ergonomic range identified in Step 1. Its memory preset function allows the user to store preferred sitting and standing heights with a single button press, simplifying daily transitions.
The Veken desk is priced at $89.99 and enjoys a high rating of 4.7/5, reflecting strong customer satisfaction regarding build quality and ease of assembly. Its wooden desktop adds an aesthetic complement to the Cayglow’s white finish, while the sturdy steel frame ensures stability when the platform is fully extended. The user should position the Veken unit directly on top of the folded Murphy desk, securing it with the provided mounting brackets to prevent wobble.
Step 5: Integrate a Keyboard Tray or Converter for Flexibility
If the user prefers to keep the primary desk surface clear for writing or drawing, a keyboard tray can be added beneath the standing platform. The VIVO 32" Sit‑Stand Desk Converter serves this purpose by providing a compact lift‑assist surface that slides smoothly and supports up to 26 lb. Its steel construction and pneumatic lift mechanism ensure reliable operation without requiring additional power.
At $129.99 with a rating of 4.6/5, the VIVO converter offers a space‑efficient solution for dual‑monitor setups, as its 31.5 × 15.8 inch surface accommodates most laptop and monitor configurations. The user can mount the converter on the Veken desktop, allowing the keyboard and mouse to remain at ergonomic height while the main surface is used for drawing, note‑taking, or placing reference materials. This modular approach preserves the flexibility of the Murphy desk while delivering a fully adjustable standing experience.
Step 6: Manage Cables and Power Supplies
Proper cable management is essential to maintain a tidy appearance and prevent accidental tripping when the desk is raised. Use Velcro straps or cable clips to bundle power cords, monitor cables, and peripheral wires along the back edge of the Veken platform. Route the bundled cables through the built‑in channel of the Cayglow desk if available, or attach them to the wall using adhesive cable organizers.
Ensuring that cables have enough slack to accommodate the full range of motion prevents strain on connectors and reduces wear over time. If the user employs a laptop, a short power strip with surge protection can be placed on the lower shelf of the Murphy desk, keeping the work area uncluttered. This step enhances safety and contributes to a professional aesthetic.
Step 7: Test Stability and Adjust Ergonomic Settings
After assembly, the user should conduct a thorough stability test by gently applying pressure to the desk at various heights. Verify that the anti‑toppling brackets hold firm and that the Veken platform does not wobble when fully extended. Adjust the leveling feet on the Veken base if necessary to achieve a perfectly level surface.
Next, set the monitor height so that the top of the screen aligns with the user’s eye level, and position the keyboard tray so that elbows form a 90‑degree angle. The user should spend a few minutes working in both seated and standing positions to fine‑tune the memory presets on the Veken desk. This final calibration ensures that the converted Murphy desk supports healthy posture and efficient workflow.
Tips & Pro Tips
- Apply a non‑slip rubber pad to the underside of the Veken desktop to further prevent movement on smooth floor surfaces.
- Use a stud finder with a built‑in level to combine two installation steps into one, improving accuracy.
- Consider adding a small LED task light that clips onto the side shelf of the Murphy desk for enhanced illumination without consuming desk space.
- Periodically tighten all set screws on the Veken height‑adjustment mechanism to maintain smooth operation, as described in customer reviews.
- If the user experiences excessive noise from the pneumatic lift on the VIVO converter, apply a thin layer of silicone spray to the moving pistons.
Troubleshooting
Problem: The Veken desk does not reach the desired standing height.
Solution: Verify that the unit is powered and that the memory preset has not been overwritten. Reset the height by holding the down button for three seconds, then re‑program the desired height.
Problem: The Murphy desk feels unstable after installation.
Solution: Re‑check that all mounting screws are tightened into wall studs, and add additional wall anchors if the original studs are compromised. Use a spirit level to confirm that the desk is perfectly horizontal.
Conclusion
By following this step‑by‑step guide, the reader can successfully convert a compact Murphy desk into a versatile standing workstation that maximizes limited floor space while promoting ergonomic health. The recommended tools—Cayglow Wall‑Mounted Foldable Desk, Veken Adjustable Standing Desk, and VIVO Sit‑Stand Converter—provide reliable performance, ease of assembly, and cost‑effective solutions for micro‑apartment living. The reader is encouraged to personalize the setup with accessories that suit individual workflow preferences, thereby creating a productive and comfortable home office.
Products Mentioned in This Guide
Frequently Asked Questions
What tools are needed to convert a Murphy desk into a standing desk?
You’ll need a drill, level, measuring tape, stud finder, brackets or a height‑adjustable frame, and basic hand tools like a screwdriver and wrench.
Can I install the conversion myself without professional carpentry experience?
Yes, the guide is designed for DIYers with basic tool knowledge and follows step‑by‑step instructions for safe wall mounting and assembly.
How does a Murphy‑to‑standing desk improve ergonomics in a micro apartment?
It lets you alternate between seated and upright positions, reducing back strain and promoting better posture while keeping the workspace compact when folded.
Will the conversion affect the original Murphy desk’s folding functionality?
When installed with proper hinges or brackets, the desk will still fold up, preserving its space‑saving feature when not in use.
What are the cost considerations for this DIY conversion?
Costs include brackets or a height‑adjustable frame (typically $30‑$80), hardware, and any optional accessories, making it a budget‑friendly alternative to buying a new standing desk.